

| |
 |  |  |  |  |  |
 |
| |||||||
| MazdaSpeed 3 - How-To's MazdaSpeed 3 - How-To's - Want help out fellow owners? Post How-To's to simplify future installations for others. |

|
Welcome to Mazdaspeed Forums . You are currently viewing our boards as a guest which gives you limited access to view most discussions and access our other features. By joining our free community you will have access to post topics, communicate privately with other members (PM), respond to polls, upload content and access many other special features. Registration is fast, simple and absolutely free so please, join our community today! If you have any problems with the registration process or your account login, please contact contact us. *When you join MSF as a registered user, there will be No Ads. *Registered Members get access to the Off Topic Area of the Forum *Registered Members have an opportunity to upgrade their accounts to VIP, which brings a host of goddies for supporting MSF such as Raffles, Additional Forum Access, More PM Storage, The ability to upload more Images and many other enhancements. *Registered members also get access to the live chat box! |
 6Likes
  |
| |  | LinkBack | Thread Tools | Search this Thread | Display Modes |
 |  05-29-2013, 10:08 PM
| #1 |  |
| Approved MSF Vendor   Join Date: Dec 2008 Location: Draper, UTAH
Posts: 1,452
(View Stats)
iTrader: (6)
Rep Power: 637   Thanks: 435
Thanked 965 Times in 382 Posts
Groans: 0
Groaned at 3 Times in 3 Posts
(Thread Starter) |   Neutral : +6 score Neutral : +6 score  How-to: Install your Autotech fuel pump internals How-to: Install your Autotech fuel pump internals  Autotech Fuel Pump Internals Upgrade Autotech Fuel Pump Internals Lots of tools Bench vise Non-chlorinated brake cleaner Clean rag/towels Very clean spot on your work bench E8 inverted torx - I picked mine up at the local Autozone There is more than one way to get to the CDFP (camshaft driven fuel pump) on these cars. This is the route I took to get complete access to everything and it provides a clear view of everything. 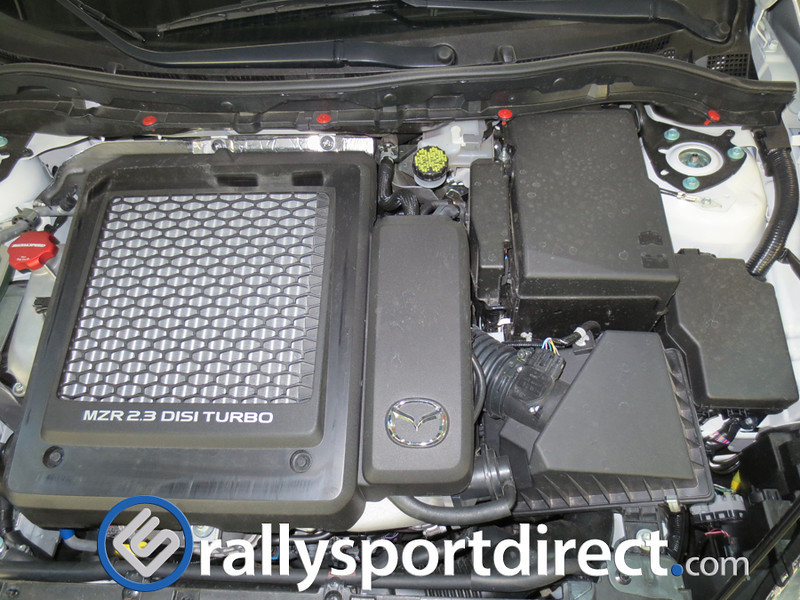 We are going to be removing all of this to gain access to the fuel pump.  All the fuses will be identified on the under side of the fuse box lid. You will need to remove the large blue one shown as "Circuit". Once removed you need to hop in the car, start it, and let it run until it dies. 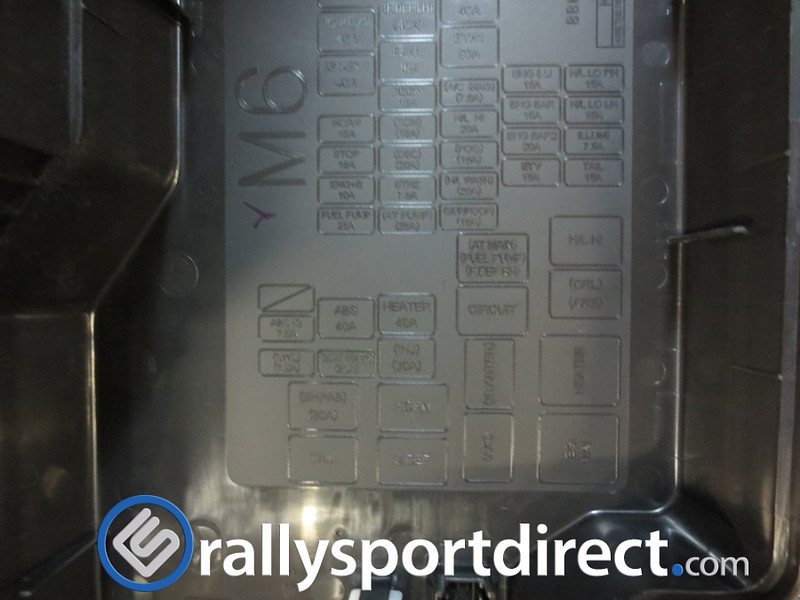  Next remove the battery. Both cables require a 10mm wrench or socket for removal. 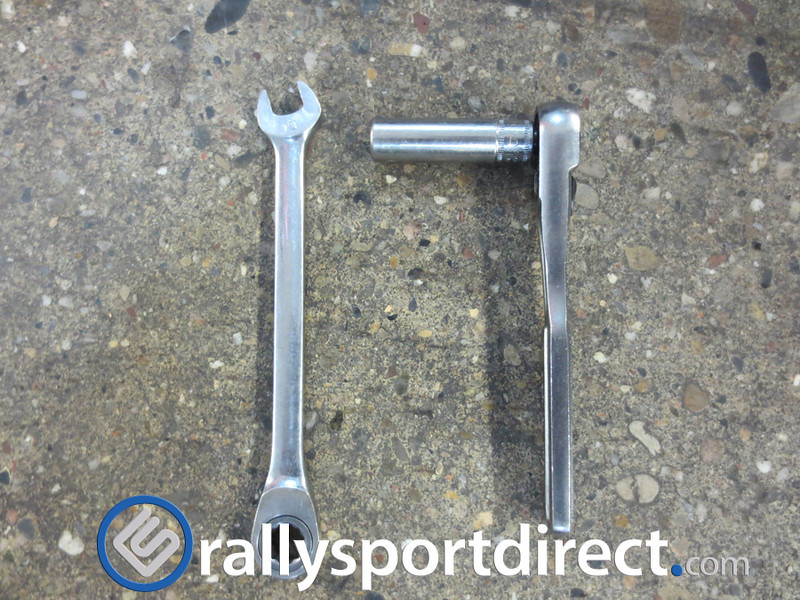  To remove the battery box you will use your 10mm socket. 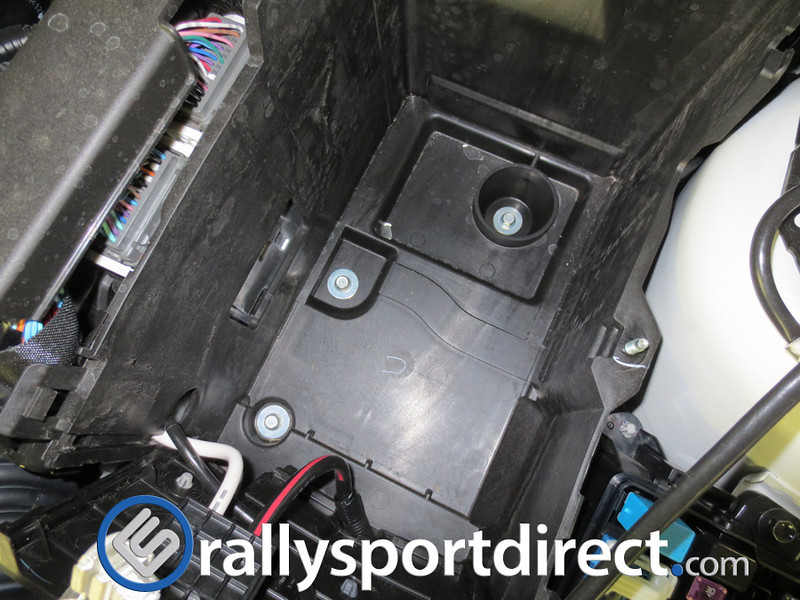 Grab your needle-nose pliers to carefully remove all 3 clips on the front side of the battery box.  Remove the cover over the ECU by releasing the tab and pulling up. Once removed unclip the harnesses to the ECU and remove the ECU. 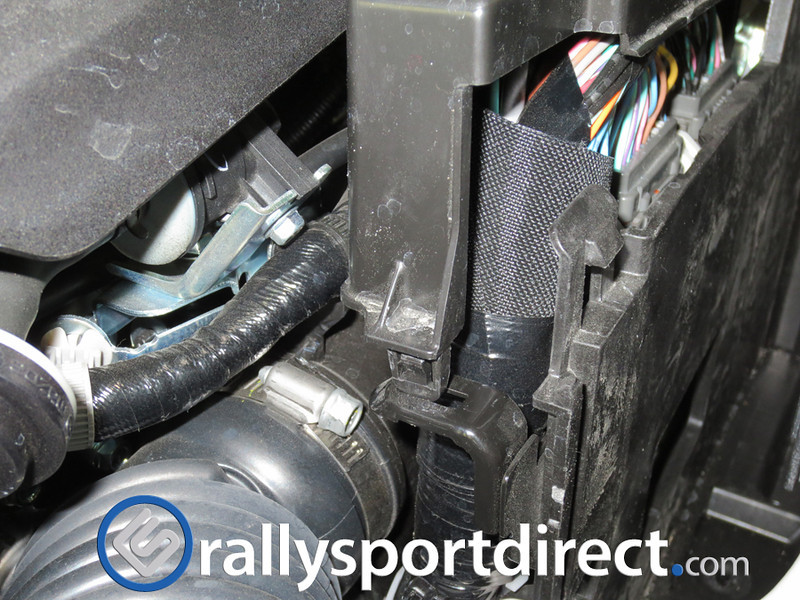 Be careful with these zip clips that you don't break them. If you grab a super small flat head and stick it in the underside it will release the band so you can move the positive cable aside. 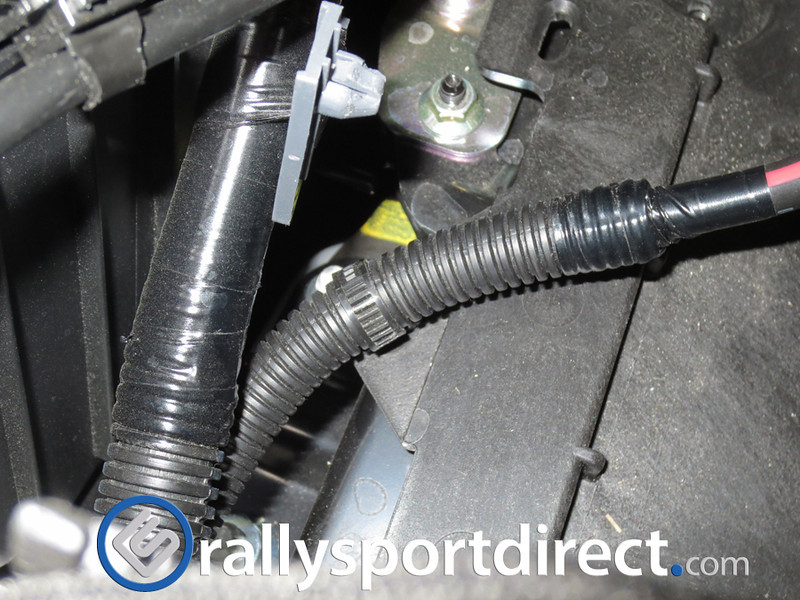 Do the same here to be able to unplug the mass air flow sensor and move it aside. 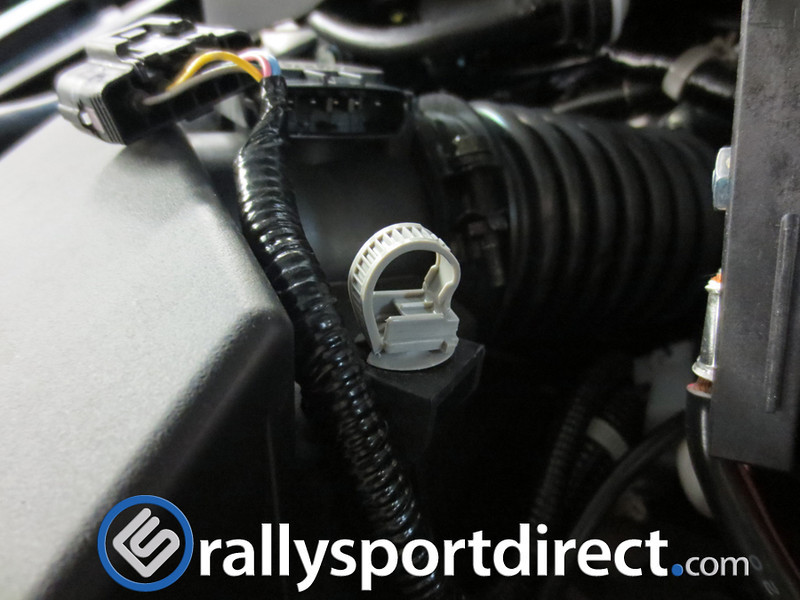 Loosen the hose clamp with a 10mm and unclip the top half of the airbox and remove. 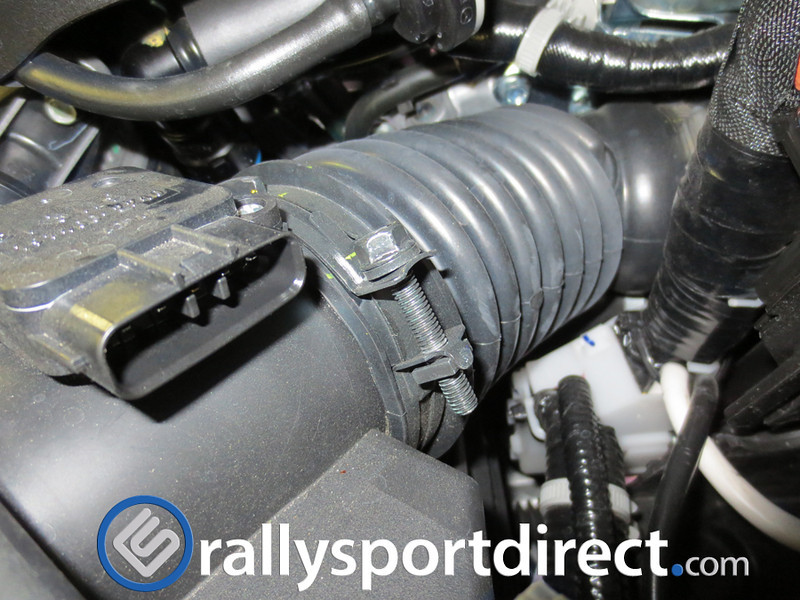 Use your 10mm again to remove the bolt holding the lower half of the airbox and remove it along with the filter.  Your engine bay should look like with everything that has been removed. 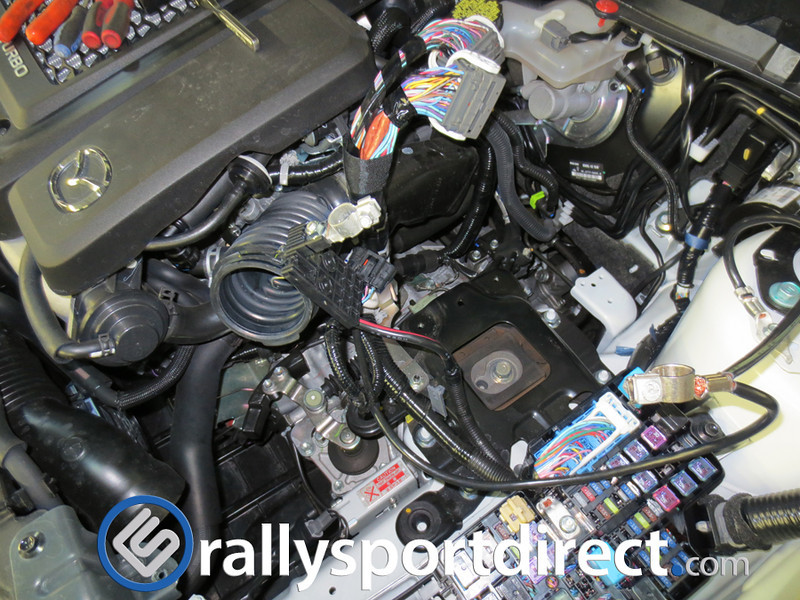 Pull out gently on the tab in the middle to pull up and detach the wire loom. Once detached push it aside.  Using a 10mm socket remove the 2 bolts in the engine/intercooler cover and remove. 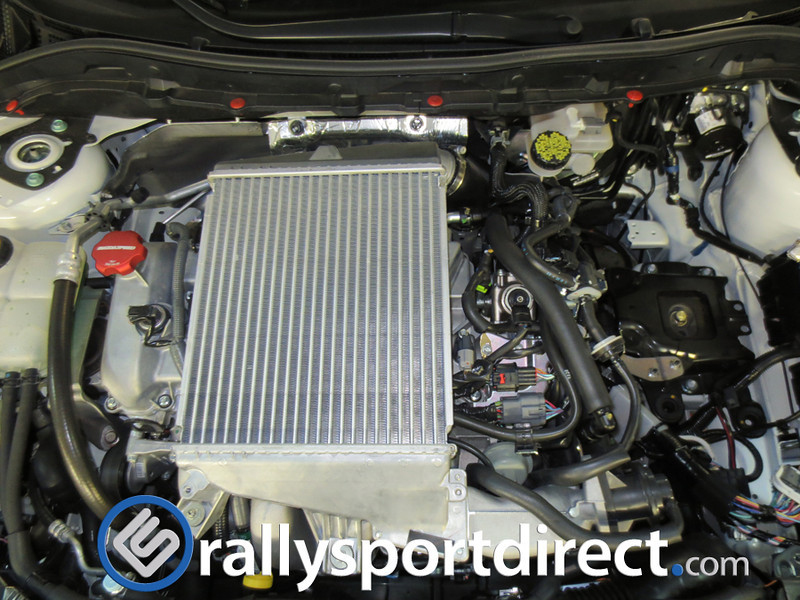 Depress the blue tabs on both sides and pull up on the breather hose to remove from the intake hose.  Using your 10mm again loosen the worm clamp to remove the intake hose. 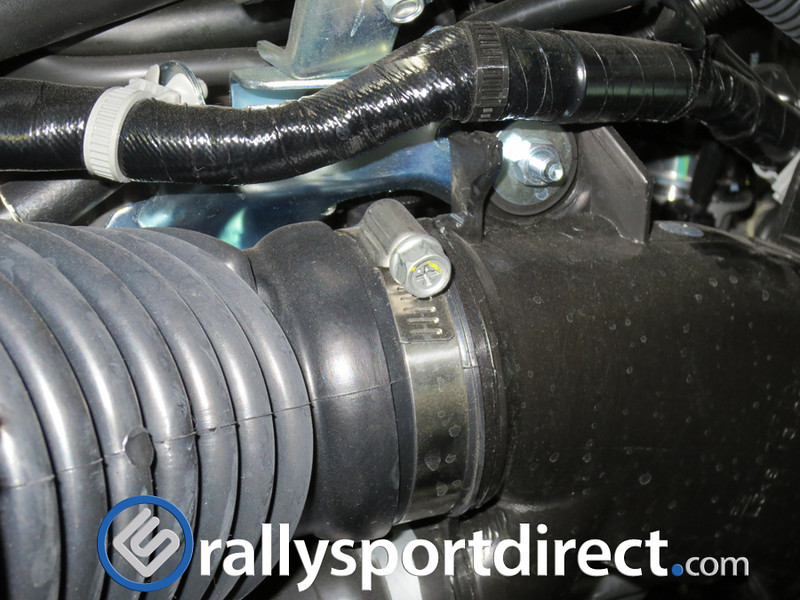 Remove the nut holding the turbo inlet down with your 10mm. Using pliers squeeze the tabs on the clamp holding the BPV recirculation hose while pulling the hose off of the turbo inlet hose. Using needle-nose pliers squeeze the white clip holding the wire loom to the turbo inlet hose and push it through the other side to detach.  With your 10mm, loosen the worm clamp holding the turbo inlet hose to the turbo inlet. 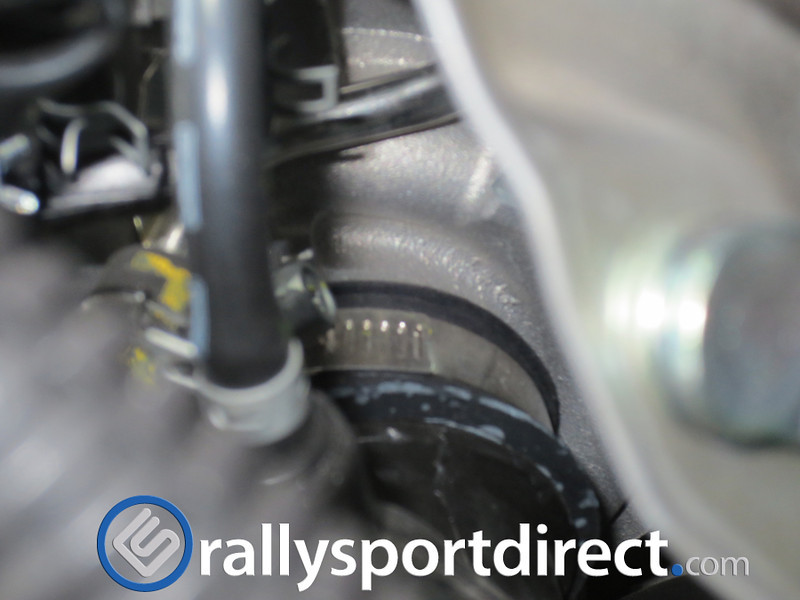 Everything should look similar to this at this stage.  Remove both of these 10mm bolts and move the bracket attached to the wire looms aside.  You now have plenty of room to remove the connector on the top of the fuel pump and to disconnect both the yellow and blue fuel lines. 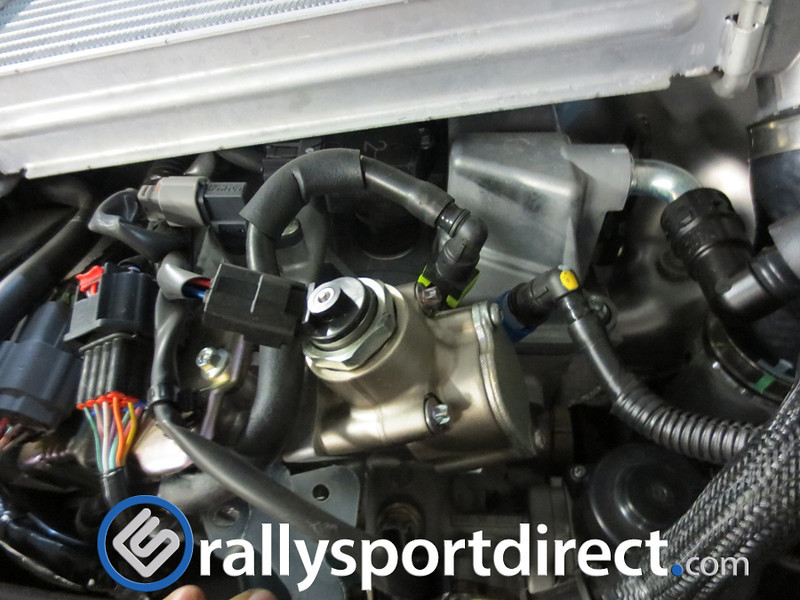 To disconnect the fuel lines all you need to do is think of the yellow and blue bands as collars that are holding everything in place. If you very gently spread both sides of the collars and lift up on the fuel line they will come right off of the fuel pump.  You will now want to disconnect the fuel line to the bottom of the pump. You want to be somewhat careful with this part. Place a ziptie or a rag like me in the hole where the line comes up to the bottom of the pump. This will prevent the compression nut from falling down below. You need 17mm and 19mm open ended wrenches. The 17mm will be placed directly under the pump to ensure that fitting does not rotate at all. Place your 19mm wrench on the compression nut below and break the 19mm loose while ensuring the 17mm does not move. Once broken loose you should be able to spin it down by hand. In my picture you can see the line is still sitting in the fitting off the bottom of the pump. you'll have to get brutal and move the line down enough to get it of the way just enough that the pump can be removed once we remove the 3 E8 inverted torx bolts. 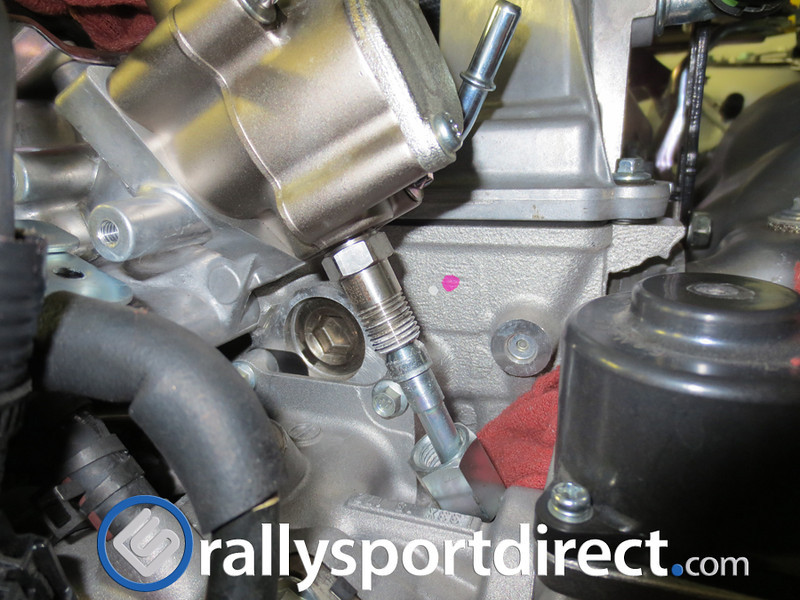 Grab your E8 socket and wrench and you will carefully loosen the 3 bolts holding the fuel pump 1 turn at a time between each bolt so that it comes out evenly. The reason to be very careful here is these bolts screw into aluminum and the pump is going to have a decent amount of pressure pushing on the bolts. If you take one bolt out then the next and then go to remove the 3rd you risk the threads getting deformed since there is only 1 bolt taking all that stress. 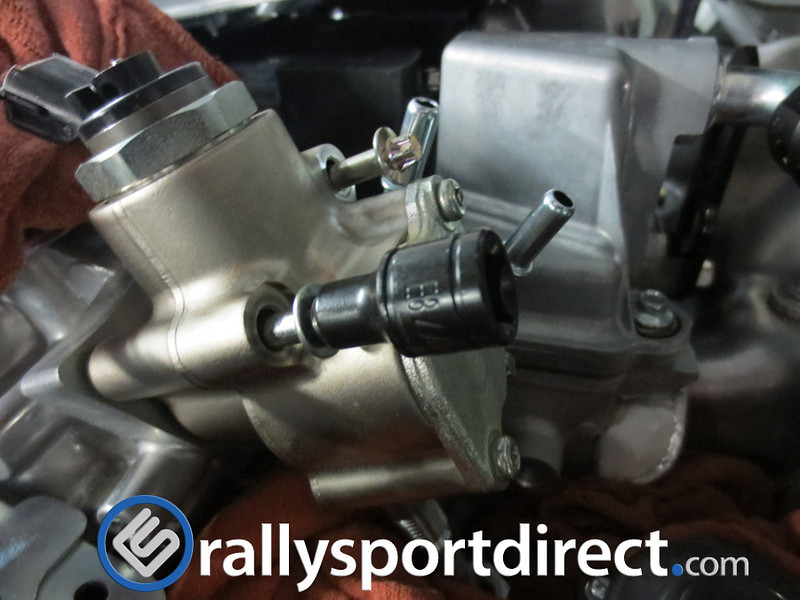 Once the three bolts are out you can remove the pump and place it on your designated clean area on your workbench. 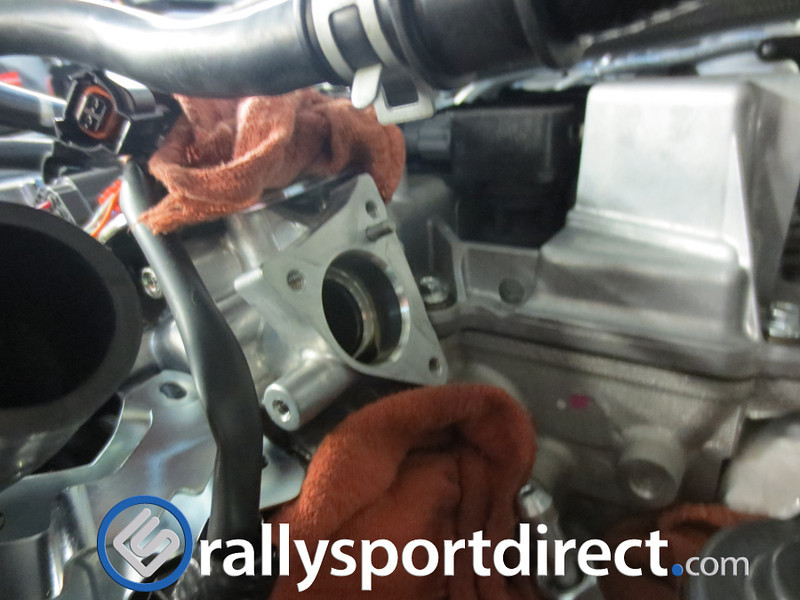 Grab your pump and secure it tightly in your bench vise. Grab a deep 18mm 6 point socket and a breaker bar. Break the 18mm nut loose below the spring and retainer assembly. Remove the assembly from the pump. Once removed place everything on your clean workbench.  Pull out your Autotech internals that you picked up from the awesome guys at RallySport Direct  . .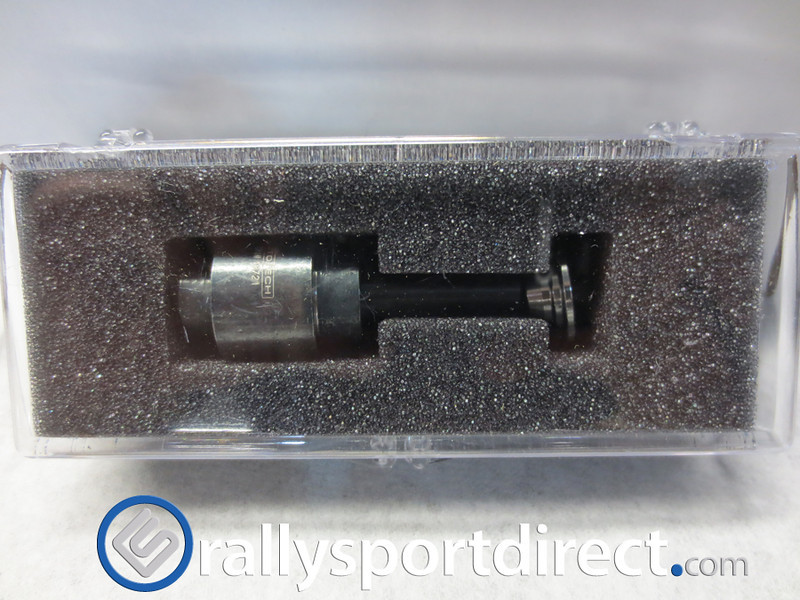 Unpackaged, you can see the Autotech parts next to your stockers.  Pull the outter portion of your stock parts on the bottom out and push the shaft up to remove it from the other end. Ensure everything is very clean, at this point if you need to clean anything use your non-chlorinated brake cleaner. Get the shaft from the Autotech kit and lubricate it with engine oil. Slide it up through the bottom of your 18mm stainless nut assembly. 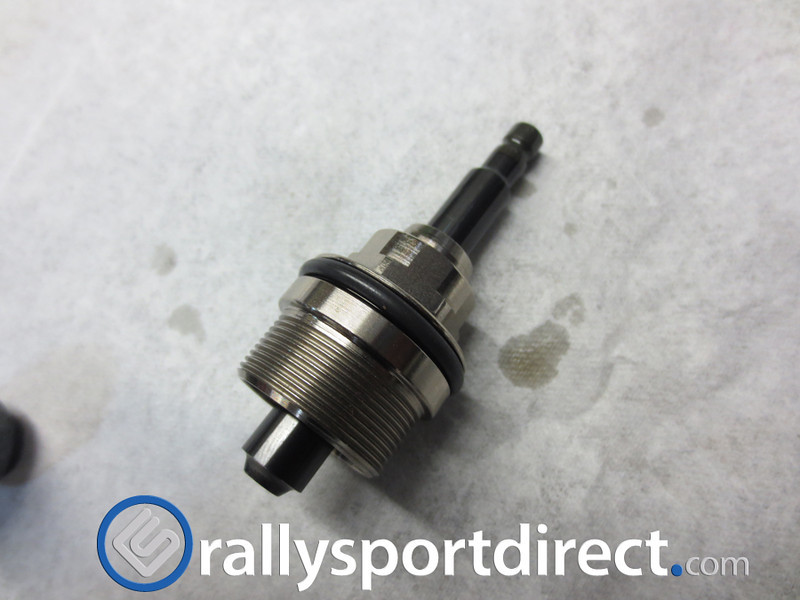 Grab the large outer ring of the Autotech kit and lubricate the inside with engine oil. With the larger diameter end going in first very gently slide it over the end of the shaft. DO NOT FORCE THIS. It should slide on very smooth and easy. 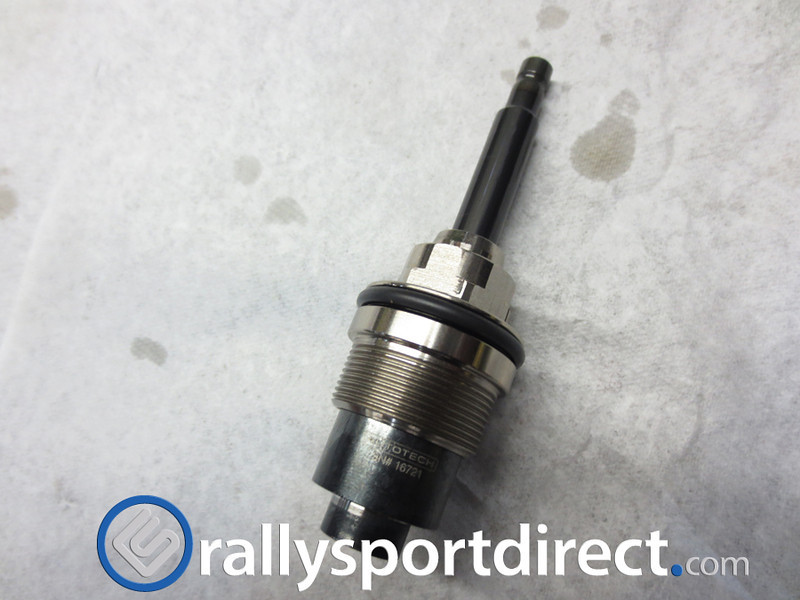 Ensure that the spring is correctly seated. 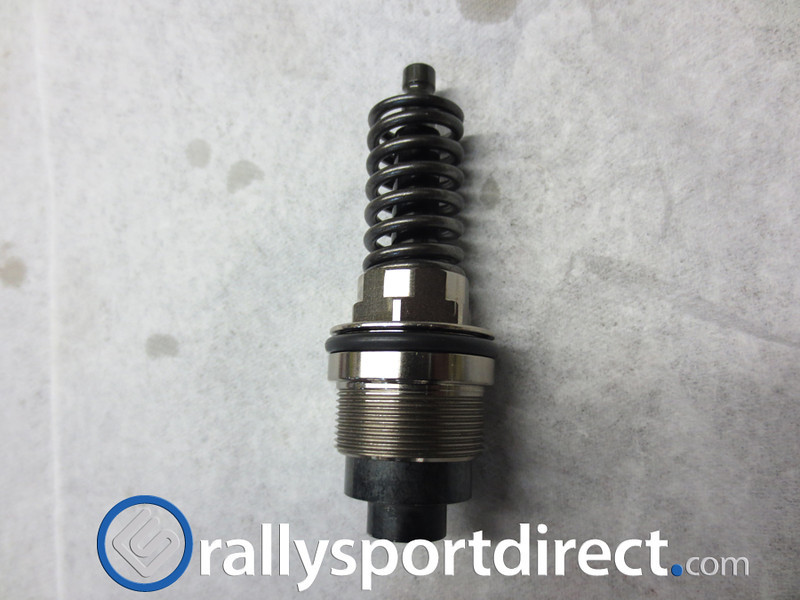 Get the retainer that came with the Autotech kit and place it over the top of the shaft and seat it all the way on the spring. 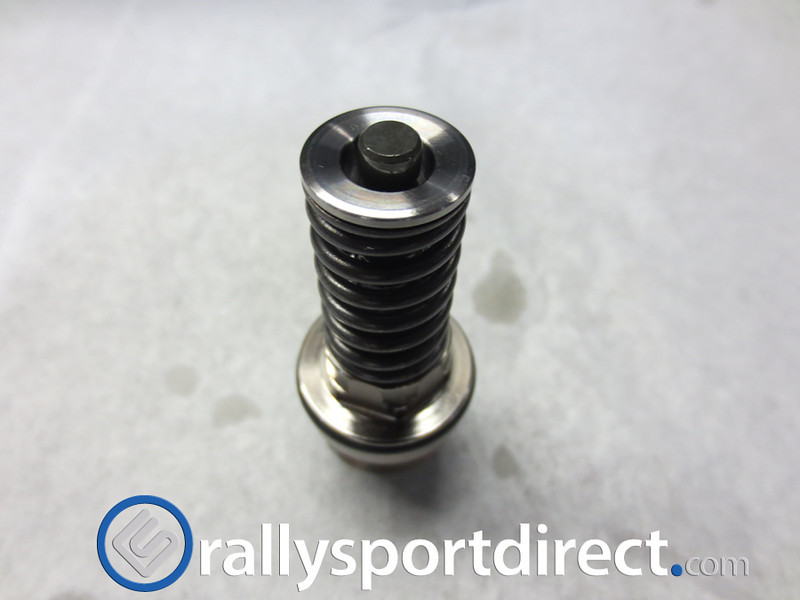 Grab the 2 Autotech keepers, ensuring that they are oriented correctly you can set them between the shaft and the retainer. 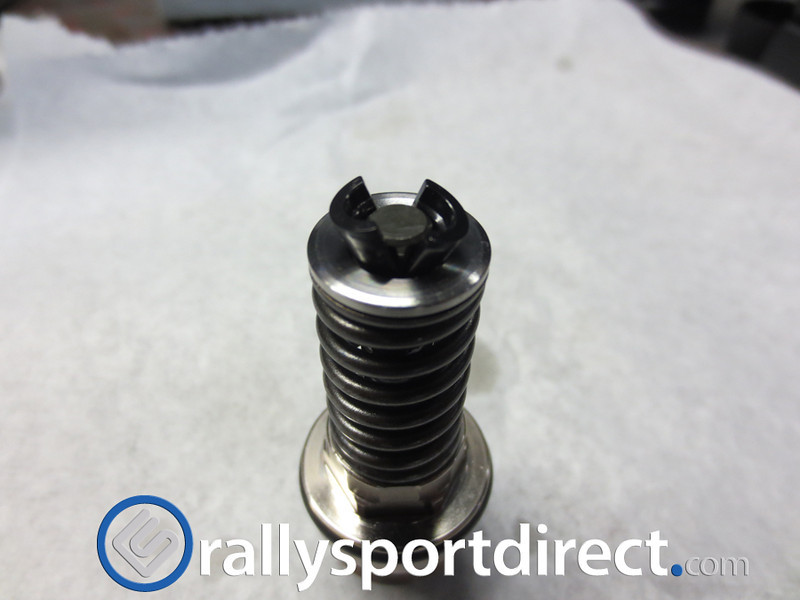 There is more than one way to seat the keepers to finish this part up. I was able to grab a socket the same diameter as the retainer and applied downward force very carefully to compress the spring enough that the keepers dropped in. Letting the pressure off of the spring very slowly the keepers will seat and you are done with the hard part. 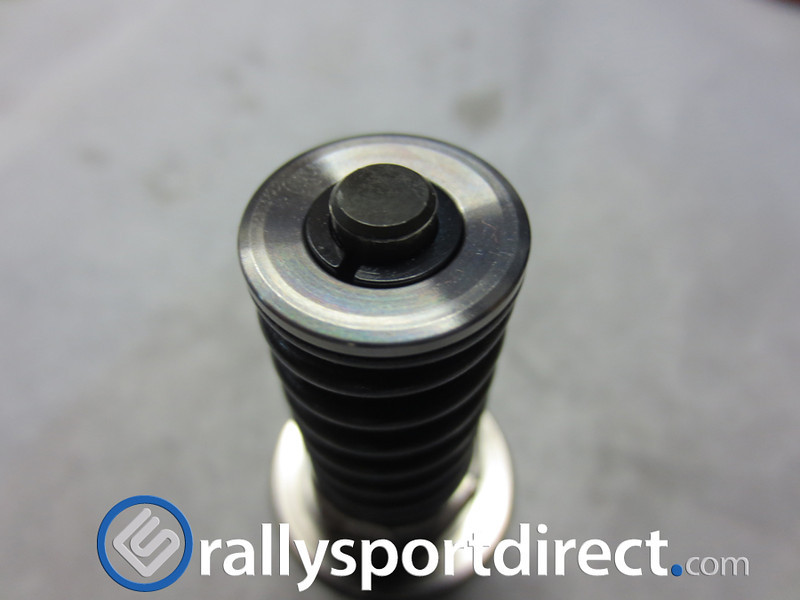 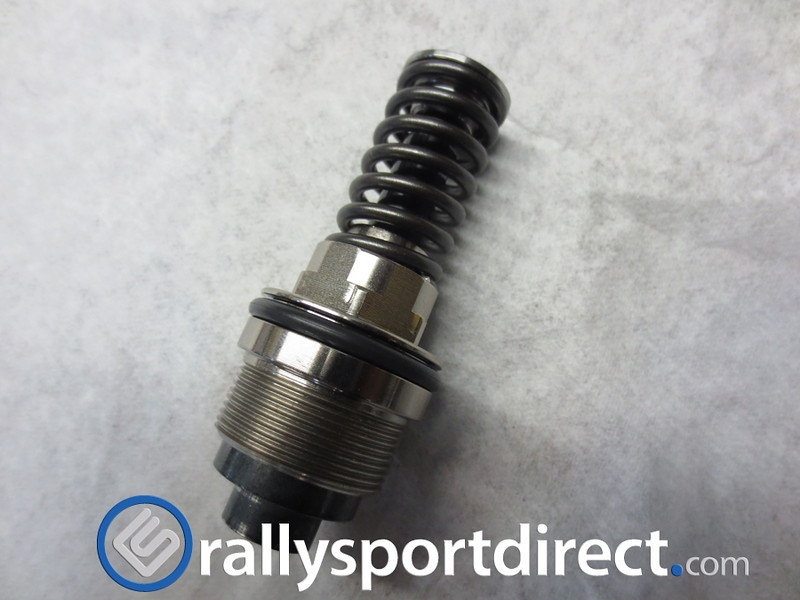 At this stage you need to ensure that your pump is spotless inside and out. Use a little engine oil to lubricate the o-ring on the internals assembly and hand tighten them back into the pump. Get your torque wrench and with the pump in the vise and with the 18mm you used to remove the internals you will tighten them down to 45ft/lbs. The pump is assembled and ready for reinstallation. Use some engine oil and lubricate the o-ring on the fuel pump and complete the steps above in reverse order to put everything back together. 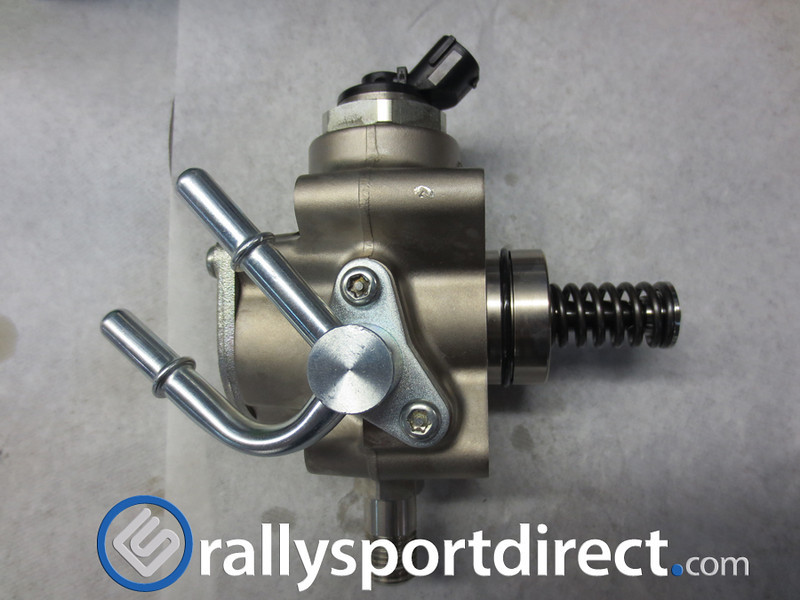 When reinstalling the pump you will tighten the E8 inverted torx bolts from 80 to 97 inch/lbs. Again be careful here and tighten each bolt with equal torque over a number of passes to balance the pressure across all bolts.  Thanks, Tanner For more information click here:
__________________  |

|   |
| The Following 25 Users Say Thank You to RallySportDirect For This Useful Post: | 06wwpms6 (01-21-2014), 2008MS3H (02-13-2017), Arnie1229 (02-05-2015), Awal (05-31-2015), Castillo817 (03-17-2015), dale_gribble (10-08-2013), Default (06-04-2013), ericrapp0507@gmail.com (05-24-2014), friesx100 (07-02-2014), Hush (05-29-2013), Javi (05-29-2013), Jebus (08-12-2013), kolosok17 (08-25-2013), lazza151 (09-21-2019), novice_01 (03-10-2014), optiklenz13 (10-08-2013), PhillyCheese (10-12-2013), Reggaeboy143 (10-21-2013), seige123 (06-02-2013), Skyman88 (03-07-2014), Sobe (08-01-2013), WagonR (06-14-2013), warlord (05-30-2013), Z32_MS3 (02-22-2014), Zoomer_Esiason (01-01-2016) |
|
05-29-2013, 10:22 PM
| #2 | |
  Join Date: May 2012 Location: Yukon OK
Posts: 589
(View Stats)
iTrader: (16)
Rep Power: 0 Thanks: 618
Thanked 365 Times in 199 Posts
Groans: 12
Groaned at 11 Times in 5 Posts
| Not Ranked : 0 score  Beautiful How-to!! @Noobs; lol RallySportDirect and Spoodler like this. |
|
| |
| The Following User Says Thank You to Javi For This Useful Post: | RallySportDirect (05-29-2013) |
|
05-30-2013, 01:18 AM
| #3 | |
 Join Date: Feb 2009 Location: Dupont wa
Posts: 994
(View Stats)
iTrader: (0)
Rep Power: 0 Thanks: 1,527
Thanked 279 Times in 202 Posts
Groans: 25
Groaned at 33 Times in 20 Posts
| Not Ranked : 0 score well done guys!!!!! RallySportDirect likes this.
__________________  |
|
| |
| The Following User Says Thank You to memin For This Useful Post: | RallySportDirect (05-30-2013) |
|
10-08-2013, 08:07 PM
| #4 | |
 Join Date: Nov 2012
Posts: 18
(View Stats)
iTrader: (2)
Rep Power: 0 Thanks: 0
Thanked 2 Times in 2 Posts
Groans: 0
Groaned at 0 Times in 0 Posts
| Not Ranked : 0 score This is a great how-to that im going to use when my internals come in! |
|
| |
| The Following User Says Thank You to nixon99 For This Useful Post: | RallySportDirect (10-09-2013) |
|
10-08-2013, 08:25 PM
| #5 | |
  Join Date: Apr 2012 Location: Temecula, CA
Posts: 4,720
(View Stats)
iTrader: (3)
Rep Power: 5431 Thanks: 2,552
Thanked 10,531 Times in 2,900 Posts
Groans: 12
Groaned at 24 Times in 21 Posts
| Not Ranked : 0 score Great job RSD! Very good pictures and explanation.
__________________ 2006 MS6 WWP Sport - 340whp/350wtq JBR 3"- BNRS3V2 - GS EBCS - CUSTOM FMIC - CS IM - LTR7IX - CMGS WMI & D07 GA - TURBOXS HEADER - FIDANZA FW - CP-E CATTED DP - 3" CATBACK BILSTEIN - H&R SPRINGS - 18x8.5 +48 ROTA SVN - 265/35R18 HTR ZIII MINI H1 6.0 - CAR LED TAILS SEE MORE USING !SHOUTTAG.COM - ENTER: !6SPEED6 |
|
| |
| The Following User Says Thank You to dale_gribble For This Useful Post: | RallySportDirect (10-09-2013) |
|
10-12-2013, 12:51 PM
| #6 | |
 Join Date: Jan 2013 Location: Perkinsville, VT
Posts: 226
(View Stats)
iTrader: (0)
Rep Power: 0 Thanks: 367
Thanked 176 Times in 89 Posts
Groans: 1
Groaned at 2 Times in 2 Posts
| Not Ranked : 0 score Just used this the other day. Great job. Very clear and simple how to RallySportDirect likes this.
__________________ MOD LIST UNDER CONSTRUCTION |
|
| |
| The Following User Says Thank You to PhillyCheese For This Useful Post: | RallySportDirect (10-12-2013) |
|
10-12-2013, 08:23 PM
| #7 | |
| Approved MSF Vendor Join Date: Dec 2008 Location: Draper, UTAH
Posts: 1,452
(View Stats)
iTrader: (6)
Rep Power: 637 Thanks: 435
Thanked 965 Times in 382 Posts
Groans: 0
Groaned at 3 Times in 3 Posts
(Thread Starter) | Not Ranked : 0 score

__________________ | |
|
| |
|
03-03-2014, 09:23 AM
| #8 | |
 Join Date: Feb 2014 Location: Currently, Middle of the Road Afghanistan.
Posts: 171
(View Stats)
iTrader: (0)
Rep Power: 0 Thanks: 10
Thanked 56 Times in 40 Posts
Groans: 1
Groaned at 0 Times in 0 Posts
| Not Ranked : 0 score Just ordered my internals i'm pretty stoked!
__________________ 2013 GenPU  |
|
| |
|
03-05-2014, 12:14 PM
| #9 | |
 Join Date: May 2011 Location: 3o3 Colorado
Posts: 16
(View Stats)
iTrader: (0)
Rep Power: 0 Thanks: 1
Thanked 9 Times in 4 Posts
Groans: 0
Groaned at 0 Times in 0 Posts
| Not Ranked : 0 score I was unable to pick up an e8 socket, but I was able to use a short 12 point 1/4" wrench to get the pump bolts on/off |
|
| |
|
05-24-2014, 01:25 PM
| #10 | |
 Join Date: Jun 2008 Location: Faairport NY
Posts: 281
(View Stats)
iTrader: (0)
Rep Power: 0 Thanks: 205
Thanked 117 Times in 75 Posts
Groans: 3
Groaned at 5 Times in 4 Posts
| Not Ranked : 0 score just fanatastic how to Nice clear pictures along with soild instructions. I owe you guys a beer or two. Thank you thank you |
|
| |
|
06-02-2014, 06:53 PM
| #11 | |
| Join Date: May 2014 Location: Cleveland Ohio
Posts: 189
(View Stats)
iTrader: (0)
Rep Power: 0 Thanks: 18
Thanked 30 Times in 20 Posts
Groans: 0
Groaned at 2 Times in 1 Post
| Not Ranked : 0 score Great how to! Made the job go real smooth. Only problem I came across was my stock internals were stubborn and didnt want to come apart from the spring. Thanks for making it easy. |
|
| |
|
01-13-2018, 10:16 AM
| #12 | |
 Join Date: Jun 2013
Posts: 1
(View Stats)
iTrader: (0)
Rep Power: 0 Thanks: 0
Thanked 0 Times in 0 Posts
Groans: 0
Groaned at 0 Times in 0 Posts
| Not Ranked : 0 score Ok, so I am placing the shaft into the chamber, its a little tight. Finally the shaft comes through and out pops a little sliver of what looks like a seal. Is there seals in the Chamber? I am STUCK not putting the damn thing back together because I dont know if I fucked up the chamber or not, and of coarse....Cobb is closed today. Any info pllllease help a momma out! Thank you Ciaran 
__________________ I'm a bish...just not yours! |
|
| |
|
01-18-2018, 02:36 PM
| #13 | |
 Join Date: Jun 2014 Location: San Diego, CA
Posts: 86
(View Stats)
iTrader: (0)
Rep Power: 0 Thanks: 8
Thanked 12 Times in 11 Posts
Groans: 0
Groaned at 0 Times in 0 Posts
| Not Ranked : 0 score Did you resolve this issue yet?
__________________ 2013 MS3: COBB AP v3, CS SRI/TIP, CP-E TMIC, UR TP, CS HPFP, CS BPV, JBR OCC, COBB shift weight, Conti DWS, some rice... |
|
| |
|
01-19-2018, 12:12 AM
| #14 | |
| MSF's Punishing Member   Join Date: Apr 2011
Posts: 2,992
(View Stats)
iTrader: (7)
Rep Power: 2794 Thanks: 5,165
Thanked 5,320 Times in 1,863 Posts
Groans: 546
Groaned at 179 Times in 116 Posts
| Not Ranked : 0 score
__________________ 94 M MS6 IS350 | |
|
| |
|
05-31-2018, 08:45 PM
| #15 | |
| Join Date: Jul 2017 Location: Washington
Posts: 23
(View Stats)
iTrader: (0)
Rep Power: 0 Thanks: 3
Thanked 0 Times in 0 Posts
Groans: 0
Groaned at 0 Times in 0 Posts
| Not Ranked : 0 score If i got some used internals from a buddy, but he lost the two plastic keepers that hold down the retainer, do I need to get some new keepers, or will the stock fuel pump retainer work with the autotech internal? |
|
| |
|
09-21-2019, 12:43 PM
| #16 | |
  Join Date: Jul 2017
Posts: 50
(View Stats)
iTrader: (0)
Rep Power: 33 Thanks: 9
Thanked 4 Times in 4 Posts
Groans: 1
Groaned at 3 Times in 2 Posts
| Not Ranked : 0 score Thank you! Will be going over to a Mechanic mate to do the install tomorrow. These instructions sure help a lot.
__________________ 2010 Gen 2 Velocity Red - Freektuned  - AP V3 - HPFP - Cobb RMM - Damond PMM - Turbo Back Custom SS Race Pipe - K&N Drop in Air Filter - Bov - Raiden by Lenso Forge Type Monoblock 18 x 8 ET/ 35 Wheels - Falken Azenis FK510 235/40 Tyres - Webasto Sunroof. |
|
| |
|
 LinkBacks (?)
LinkBack to this Thread: http://www.mazdaspeedforum.org/forum/forum/f33/how-install-your-autotech-fuel-pump-internals-146760/ | ||||
| Posted By | For | Type | Date | |
| My New MPS 6 Seems sick already :( Warrany Fix?) | This thread | Pingback | 09-17-2014 05:11 AM | |
| ???????, ??, ????????? Autotech. | This thread | Refback | 04-28-2014 12:43 AM | |
| How-to: Install your Autotech fuel pump internals - Mazdaspeed Forums | This thread | Refback | 07-05-2013 06:30 PM | |
| Currently Active Users Viewing This Thread: 1 (0 members and 1 guests) | |
| |
|
Similar Threads | ||||
| Thread | Thread Starter | Forum | Replies | Last Post |
| How-to: Install your Autotech fuel pump internals | RallySportDirect | MazdaSpeed 6 - How-To's | 3 | 09-24-2014 03:33 PM |
| How-to: Install your Autotech fuel pump internals | RallySportDirect | 2010 MS3 - How-To's | 9 | 08-13-2014 10:21 PM |
| How-to: Install your Autotech fuel pump internals | RallySportDirect | MazdaSpeed 3 - How-To's | 0 | 05-20-2013 04:04 PM |


 Linear Mode


